TL;DR — How I published this Jekyll website on IPFS within minutes, then spent a few more hours improving the user experience.
A few weeks back, I wanted to play with IPFS and decided to deploy my website on it. It was way easier than I anticipated, and within hours, I had a pretty good understanding of what IPFS is, how to leverage it and published this website on it.
What is IPFS?
IPFS is a decentralized system for storing and accessing files, websites, applications, and data. Contrary to Freenet where you keep others’ content on your node, IPFS will only store whatever you uploaded to it or manually decided to cache (pin in IPFS language).
Running a node is super easy. You just need to download their desktop app. You will then be able to make any files available on the network by drag&dropping them.
It seems IPFS will become one of the default storage layer of the Web 3.0, and many NFTs are hosted on it.
Build your website
I use Jekyll, but any static website generator will work. With IPFS, your website might be browsed through a gateway, and you don’t control the path under which it might be browsed at. For example, on the ipfs.io gateway, your root index.html file for your website would be accessed at https://ipfs.io/ipfs/cid/index.html under /ipfs/cid/.
This reminds me of a very long time ago, when your website could be hosted on http://something.com as well as http://something.com/~your_username, relative links were then mandatory.
With IPFS, you must make sure all links are relatives and not absolute. Jekyll
doesn’t easily do that, but the
all-relative npm package will do
that for you. My build Makefile rule is:
build:
        bundle exec jekyll build
        cd _site/ && npx all-relative
Install IPFS
Download and install IPFS Desktop or use their
CLI. If
using the CLI, you must run ipfs init.
Publish content
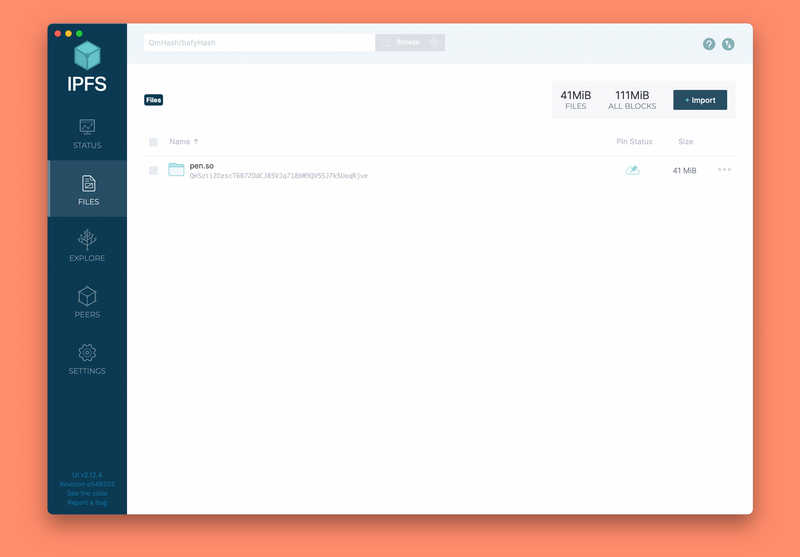
Drag and drop your _site folder to the IPFS desktop application using the +
Import button, or use ipfs add -r _site with the CLI. That’s it. Your
website is now available online (check the Share link option on your folder
on the desktop app).
The Share link will give you a URL with the following format: https://ipfs.io/ipfs/*cid*. When you visit this URL, ipfs.io will search for the content based on the cid. It will fetch it from your local node which is hosting a copy of the files.
ipfs.io is being used as an IPFS gateway. Gateways usually cache content for a while, but the only real copy will be on your node. If you stop your node or your computer isn’t connected anymore, gateways or other IPFS nodes won’t fetch its content.
Pin your files on another node
To increase reliability, you want to pin your files on another IPFS node. Pin means that the node will cache those files locally and host a copy of them. You can also pin other cids on your local IPFS node.
Public pin services are available like pinata.cloud or nft-storage. I use both and a local IPFS node on my Synology. My files are replicated on 3 locations minimum.
IPFS Cluster and Collaborative clusters are something I haven’t played with yet, but they will also give you redundancy.
IPNS
The cid hash depends on the content of your files, meaning every time you change your website, that cid will change, and the gateway link will change. This is not really efficient, so you will use IPNS.
IPNS are hashes of a public key, and only the owner of the private key (you) can sign it and link to the most version of your website.
Every time you store a new version of your website to your local node with ipfs
add _site, you will also publish it using ipfs name publish *cid*. This will
give you an IPNS address that will never change, based on your private
key stored in ~/.ipfs/config and used to sign the files’ content.
If you change that private key (for example, if you use another computer), you
will have a different IPNS address. IPNS names always start with k51.... Once
you published those files, the URL to view them will be
https://ipfs.io/ipns/k51..., and this won’t change any more.
As an example, this website is available at https://ipfs.io/ipns/k51qzi5uqu5dge5aqz5j93qml6s2sfjpg9qzc9wpcqv67ddvzbjz86c7fb35hk/
DNSLink
Linking to IPNS names is a pain, it’s too long and hard to remember.
DNSLink allows you to connect your DNS to your current
IPFS cid. Just add a DNS entry under _dnslink.domain.com with a TXT value
of /ipfs/*cid* or /ipns/k51... and any IPFS gateway will allow you to link
to https://ipfs.io/ipns/domain.com instead:
$ dig +short TXT _dnslink.pen.so
"dnslink=/ipns/k51qzi5uqu5dge5aqz5j93qml6s2sfjpg9qzc9wpcqv67ddvzbjz86c7fb35hk/"
As an example, this website is available at https://ipfs.io/ipns/pen.so/
You’ll obviously want to use your IPNS and not your IPFS cid so you don’t have to update your DNS anymore.
IPFS Gateways
If you use Firefox and the IPFS Companion extension, going to https://ipfs.io/ipns/pen.so will automatically redirect you to http://pen.so.ipns.localhost:8080/. ipns.localhost:8080 is your local IPFS gateway, using IPFS Desktop.
You just accessed the IPFS hosted files without a central authority (except the DNS query).
But you can’t expect users to have IPFS installed. A user without a local IPFS node can view any IPFS file through an IPFS gateway. There are many public IPFS gateways like pinata, ipfs.io, infura, ipns.co, fleek but not all support IPNS naming, and some have very poor connectivity.
If you want to host your website on IPFS long-term, it’s best to just update your DNS and point it to Cloudflare.
DNS Settings
Cloudflare offers
a way to host your IPFS content on your own domain instead, for free. Just add
a CNAME to www.cloudflare-ipfs.com. and submit your domain at the bottom of
this page, so they
generate an SSL certificate:
$ dig +short CNAME ipfs.pen.so
www.cloudflare-ipfs.com.
As an example, this website is available through the Cloudflare gateway at
https://ipfs.pen.so. I decided to use the subdomain
ipfs.pen.so as a test, but I’m considering moving pen.so from Netlify to
IPFS. I’ve checked the past weeks, Cloudflare is very stable, and I see no
point in not going fully decentralized.
ENS
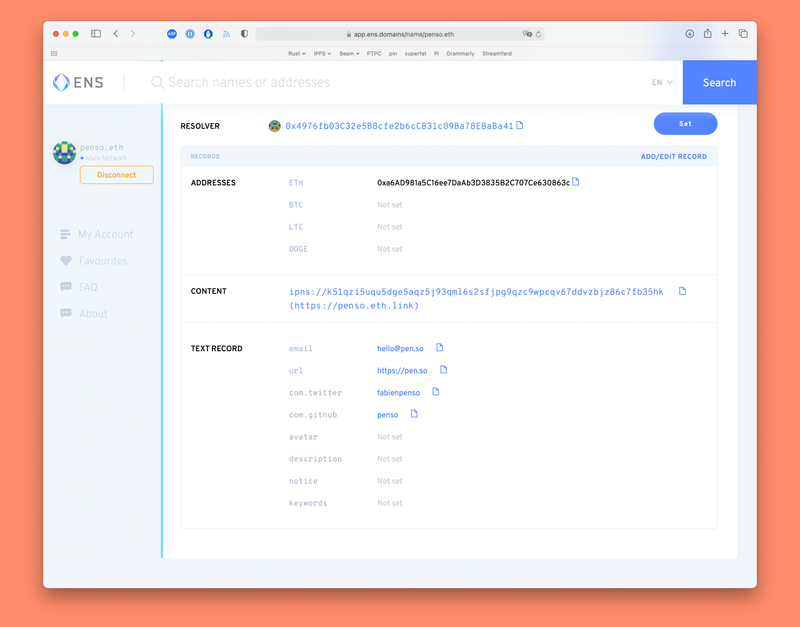
DNS is the last step from being entirely decentralized. You’ll want to use https://ens.domains instead, a decentralized naming over Ethereum, used by many. It will use the Etherum blockchain to store your naming.
I bought penso.eth and, using their interface, set my content to my IPNS
hash /ipns/k51.... When using Firefox, using penso.eth/ in the URL will
know where to fetch the content on IPFS.
.link domain
However since you can’t expect everyone to have the IPFS extension installed,
you can also use penso.eth.link. Any .eth ENS
domain has a .link as a free IPFS gateway.
Users with the IPFS extension will automatically use their local IPFS gateway
for any .link domains.
More
The following links helped me understanding IPFS:
- Deploy a static website to IPFS
- IPFS: The (very slow) distributed permanent web
- Deploy your website on IPFS: Why and How
- What’s really happening when you add a file to IPFS?
- Where does IPFS store all the data?
- eth.link
- Fleek: Easy deploy website to IPFS. Feels like Netlify for IPFS.
- Merkle Directed Acyclic Graphcs
- IPNS, explanation needed about k51 key
- Torrent Paradise: Torrent index on IPFS
- Best Practices for Storing NFT Data using IPFS